Summary #
- Compressed NFTs (cNFTs) use State Compression to hash NFT data and store the hash onchain in an account using a concurrent Merkle tree structure.
- The cNFT data hash can’t be used to infer the cNFT data, but it can be used to verify if the cNFT data you’re seeing is correct.
- Supporting RPC providers index cNFT data offchain when the cNFT is minted so that you can use the Read API to access the data
- The Metaplex Bubblegum program is an abstraction on top of the State Compression program that enables you to more simply create, mint, and manage cNFT collections.
Lesson #
Compressed NFTs (cNFTs) are exactly what their name suggests: NFTs whose structure takes up less account storage than traditional NFTs. Compressed NFTs leverage a concept called State Compression to store data in a way that drastically reduces costs.
Solana's transaction costs are so cheap that most users never think about how expensive minting NFTs can be at scale. The cost to set up and mint 1 million traditional NFTs using the Token Metadata Program is approximately 24,000 SOL. By comparison, cNFTs can be structured to where the same setup and mint costs 10 SOL or less. That means anyone using NFTs at scale could cut costs by more than 1000x by using cNFTs over traditional NFTs.
However, cNFTs can be tricky to work with. Eventually, the tooling required to work with them will be sufficiently abstracted from the underlying technology that the developer experience between traditional NFTs and cNFTs will be negligible. But for now, you'll still need to understand the low level puzzle pieces, so let's dig in!
A theoretical overview of cNFTs #
Most of the costs associated with traditional NFTs come down to account storage space. Compressed NFTs use a concept called State Compression to store data in the blockchain’s ledger state, only using the account state to store a “fingerprint”, or hash, of the data. This hash allows you to cryptographically verify that data has not been tampered with.
To both store hashes and enable verification, we use a special binary tree structure known as a concurrent Merkle tree. This tree structure lets us hash data together in a deterministic way to compute a single, final hash that gets stored onchain. This final hash is significantly smaller than all the original data combined, hence the “compression.” The steps to this process are:
- Take any piece of data
- Create a hash of this data
- Store this hash as a “leaf” at the bottom of the tree
- Each leaf pair is then hashed together, creating a “branch”
- Each branch is then hashed together
- Continually climb the tree and hash adjacent branches together
- Once at the top of the tree, a final ”root hash” is produced
- Store the root hash onchain as a verifiable proof of the data within each leaf
- Anyone wanting to verify that the data they have matches the “source of truth” can go through the same process and compare the final hash without having to store all the data onchain
One problem not addressed in the above is how to make data available if it can't be fetched from an account. Since this hashing process occurs onchain, all the data exists in the ledger state and could theoretically be retrieved from the original transaction by replaying the entire chain state from origin. However, it's much more straightforward (though still complicated) to have an indexer track and index this data as the transactions occur. This ensures there is an offchain “cache” of the data that anyone can access and subsequently verify against the onchain root hash.
This process is very complex. We’ll cover some key concepts below but don’t worry if you don’t understand it right away. We’ll talk more theory in the state compression lesson and focus primarily on application to NFTs in this lesson. You’ll be able to work with cNFTs by the end of this lesson even if you don’t fully understand every piece of the state compression puzzle.
Concurrent Merkle trees #
A Merkle tree is a binary tree structure represented by a single hash. Every leaf node in the structure is a hash of its inner data while every branch is a hash of its child leaf hashes. In turn, branches are also hashed together until eventually one final root hash remains.
Any modification to leaf data changes the root hash. This causes an issue when multiple transactions in the same slot are attempting to modify leaf data. Since these transactions must execute in series, all but the first will fail since the root hash and proof passed in will have been invalidated by the first transaction to be executed.
A concurrent Merkle tree is a Merkle tree that stores a secure changelog of the most recent changes along with their root hash and the proof to derive it. When multiple transactions in the same slot try to modify leaf data, the changelog can be used as a source of truth to allow for concurrent changes to be made to the tree.
When working with a concurrent Merkle tree, there are three variables that determine the size of the tree, the cost to create the tree, and the number of concurrent changes that can be made to the tree:
- Max depth
- Max buffer size
- Canopy depth
The max depth is the maximum number of hops to get from any leaf to the root
of the tree. Since Merkle trees are binary trees, every leaf is connected only
to one other leaf. Max depth can then logically be used to calculate the number
of nodes for the tree with 2 ^ maxDepth.
The max buffer size is effectively the maximum number of concurrent changes that you can make to a tree within a single slot with the root hash still being valid.
The canopy depth is the number of proof nodes that are stored onchain for any given proof path. Verifying any leaf requires the complete proof path for the tree. The complete proof path is made up of one proof node for every “layer” of the tree, i.e. a max depth of 14 means there are 14 proof nodes. Every proof node adds 32 bytes to a transaction, so large trees would quickly exceed the maximum transaction size limit without caching proof nodes onchain.
Each of these three values, max depth, max buffer size, and canopy depth, comes with a tradeoff. Increasing any of these values increases the size of the account used to store the tree, thus increasing the cost to create the tree.
Choosing the max depth is fairly straightforward as it directly relates to the
number of leafs and therefore the amount of data you can store. If you need
1million cNFTs on a single tree, find the max depth that makes the following
expression true: 2^maxDepth {'>'} 1million. The answer is 20.
Choosing a max buffer size is effectively a question of throughput: how many concurrent writes do you need.
SPL State Compression and Noop Programs #
The SPL State Compression Program exists to make the above process repeatable and composable throughout the Solana ecosystem. It provides instructions for initializing Merkle trees, managing tree leafs (i.e. add, update, remove data), and verifying leaf data.
The State Compression Program also leverages a separate “no op” program whose primary purpose is to make leaf data easier to index by logging it to the ledger state.
Use the Ledger State for storage #
The Solana ledger is a list of entries containing signed transactions. In theory, this can be traced back to the genesis block. This effectively means any data that has ever been put into a transaction exists in the ledger.
When you want to store compressed data, you pass it to the State Compression program where it gets hashed and emitted as an “event” to the Noop program. The hash is then stored in the corresponding concurrent Merkle tree. Since the data passed through a transaction and even exists on the Noop program logs, it will forever exist on the ledger state.
Index data for easy lookup #
Under normal conditions, you would typically access onchain data by fetching the appropriate account. When using state compression, however, it's not so straightforward.
As mentioned above, the data now exists in the ledger state rather than in an account. The easiest place to find the full data is in the logs of the Noop instruction, but while this data will in a sense exist in the ledger state forever, it will likely be inaccessible through validators after a certain period of time.
To save space and be more performant, validators don't retain every transaction back to the genesis block. The specific amount of time you'll be able to access the Noop instruction logs related to your data will vary based on the validator, but eventually you'll lose access to it if you're relying directly on instruction logs.
Technically, you can replay transaction state back to the genesis block, but the average team isn’t going to do that, and it certainly won’t be performant.
Instead, you should use an indexer that will observe the events sent to the Noop program and store the relevant data off chain. That way you don't need to worry about old data becoming inaccessible.
Create a cNFT Collection #
With the theoretical background out of the way, let's turn our attention to the main point of this lesson: how to create a cNFT collection.
Fortunately, you can use tools created by Solana Foundation, the Solana
developer community, and Metaplex to simplify the process. Specifically, we'll
be using the @solana/spl-account-compression SDK, the Metaplex Bubblegum
program @metaplex-foundation/mpl-bubblegum through the Umi library from
Metaplex.
Prepare metadata #
Prior to starting, you'll prepare your NFT metadata similarly to how you would if you were using a Candy Machine. At its core, an NFT is simply a token with metadata that follows the NFT standard. In other words, it should be shaped something like this:
{
  "name": "My Collection",
  "symbol": "MC",
  "description": "My Collection description",
  "image": "https://lvvg33dqzykc2mbfa4ifua75t73tchjnfjbcspp3n3baabugh6qq.arweave.net/XWpt7HDOFC0wJQcQWgP9n_cxHS0qQik9-27CAAaGP6E",
  "attributes": [
    {
      "trait_type": "Background",
      "value": "transparent"
    },
    {
      "trait_type": "Shape",
      "value": "sphere"
    },
    {
      "trait_type": "Resolution",
      "value": "1920x1920"
    }
  ]
}
Depending on your use case, you may be able to generate this dynamically, or you
might want to have a JSON file prepared for each cNFT beforehand. You’ll also
need any other assets referenced by the JSON, such as the image URL shown in
the example above.
Create Collection NFT #
NFTs are intrinsically unique, compared to fungible tokens which have a supply. However, it is important to bind NFTs produced by the same series together, using a Collection. Collections allow people to discover other NFTs in the same collection, and verify that individual NFTs are actually members of the Collection (and not look-alikes produced by someone else).
To have your cNFTs to be part of a collection, you’ll need to create a Collection NFT before you start minting cNFTs. This is a traditional Token Metadata Program NFT that acts as the reference binding your cNFTs together into a single collection. The procedure to create this NFT is outlined in our NFTs with Metaplex lesson
const collectionMint = generateSigner(umi);

await createNft(umi, {
  mint: collectionMint,
  name: `My Collection`,
  uri,
  sellerFeeBasisPoints: percentAmount(0),
  isCollection: true, // mint as collection NFT
}).sendAndConfirm(umi);
Create Merkle tree Account #
Now we start to deviate from the process you would use when creating traditional NFTs. The onchain storage mechanism you use for state compression is an account representing a concurrent Merkle tree. This Merkle tree account belongs to the SPL State Compression program. Before you can do anything related to cNFTs, you need to create an empty Merkle tree account with the appropriate size.
The variables impacting the size of the account are:
- Max depth
- Max buffer size
- Canopy depth
The first two variables must be chosen from an existing set of valid pairs. The table below shows the valid pairs along with the number of cNFTs that can be created with those values.
| Max Depth | Max Buffer Size | Max Number of cNFTs |
|---|---|---|
| 3 | 8 | 8 |
| 5 | 8 | 32 |
| 14 | 64 | 16,384 |
| 14 | 256 | 16,384 |
| 14 | 1,024 | 16,384 |
| 14 | 2,048 | 16,384 |
| 15 | 64 | 32,768 |
| 16 | 64 | 65,536 |
| 17 | 64 | 131,072 |
| 18 | 64 | 262,144 |
| 19 | 64 | 524,288 |
| 20 | 64 | 1,048,576 |
| 20 | 256 | 1,048,576 |
| 20 | 1,024 | 1,048,576 |
| 20 | 2,048 | 1,048,576 |
| 24 | 64 | 16,777,216 |
| 24 | 256 | 16,777,216 |
| 24 | 512 | 16,777,216 |
| 24 | 1,024 | 16,777,216 |
| 24 | 2,048 | 16,777,216 |
| 26 | 512 | 67,108,864 |
| 26 | 1,024 | 67,108,864 |
| 26 | 2,048 | 67,108,864 |
| 30 | 512 | 1,073,741,824 |
| 30 | 1,024 | 1,073,741,824 |
| 30 | 2,048 | 1,073,741,824 |
Note that the number of cNFTs that can be stored on the tree depends entirely on the max depth, while the buffer size will determine the number of concurrent changes (mints, transfers, etc.) within the same slot that can occur to the tree. In other words, choose the max depth that corresponds to the number of NFTs you need the tree to hold, then choose one of the options for max buffer size based on the traffic you expect you'll need to support.
Next, choose the canopy depth. Increasing the canopy depth increases the composability of your cNFTs. Any time your or another developer's code attempts to verify a cNFT down the road, the code will have to pass in as many proof nodes as there are “layers” in your tree. So for a max depth of 20, you'll need to pass in 20 proof nodes. Not only is this tedious, but since each proof node is 32 bytes it's possible to max out transaction sizes very quickly.
For example, if your tree has a very low canopy depth, an NFT marketplace may only be able to support simple NFTs transfers rather than support an onchain bidding system for your cNFTs. The canopy effectively caches proof nodes onchain, so you don’t have to pass all of them into the transaction, allowing for more complex transactions.
Increasing any of these three values increases the size of the account, thereby increasing the cost associated with creating it. Weigh the benefits accordingly when choosing the values.
Once you know these values, you can use the createTree method from the
@metaplex-foundation/mpl-bubblegum package to create your tree. This
instruction creates and initializes two accounts:
-
A
Merkle Treeaccount - this holds the merkle hash and is used to verify the authenticity of data stored. -
A
Tree Configaccount - this holds additional data specific to compressed NFTs such as the tree creator, whether the tree is public, and other fields - see the Bubblehum program source.
Setting up Umi #
The mpl-bubblegum package is a plugin and cannot be used without the Umi
library from Metaplex. Umi is a framework for making JS/TS clients for onchain
programs that was created by Metaplex.
Note that Umi has different implementations for many concepts than web3.js, including Keypairs, PublicKeys, and Connections. However, it is easy to convert from web3.js versions of these items to the Umi equivalents.
To get started, we need to create an Umi instance
import { createUmi } from "@metaplex-foundation/umi-bundle-defaults";
import { clusterApiUrl } from "@solana/web3.js";

const umi = createUmi(clusterApiUrl("devnet"));
The above code initializes an empty Umi instance without any signer or plugin attached to it. You can find the exhaustive list of the plugins available on this Metaplex docs page
The next part is to add in our imports and attach a signer to our Umi instance.
import { dasApi } from "@metaplex-foundation/digital-asset-standard-api";
import { createTree, mplBubblegum } from "@metaplex-foundation/mpl-bubblegum";
import { keypairIdentity } from "@metaplex-foundation/umi";
import { createUmi } from "@metaplex-foundation/umi-bundle-defaults";
import { getKeypairFromFile } from "@solana-developers/helpers";
import { clusterApiUrl } from "@solana/web3.js";

const umi = createUmi(clusterApiUrl("devnet"));

// load keypair from local file system
// See https://github.com/solana-developers/helpers?tab=readme-ov-file#get-a-keypair-from-a-keypair-file
const localKeypair = await getKeypairFromFile();

// convert to Umi compatible keypair
const umiKeypair = umi.eddsa.createKeypairFromSecretKey(localKeypair.secretKey);

// load the MPL Bubblegum program, dasApi plugin and assign a signer to our umi instance
umi.use(keypairIdentity(umiKeypair)).use(mplBubblegum()).use(dasApi());

console.log("Loaded UMI with Bubblegum");
Use Bubblegum to Initialize Your Tree #
With Umi instantiated, we are ready to call the createTree method to
instantiate the Merkle tree and tree config accounts.
const merkleTree = generateSigner(umi);
const builder = await createTree(umi, {
  merkleTree,
  maxDepth: 14,
  maxBufferSize: 64,
});
await builder.sendAndConfirm(umi);
The three values supplied i.e. the merkleTree, maxDepth and maxBufferSize
are required in order to create the tree while the rest are optional. For
example, thetree creator defaults to the Umi instance identity, while the
`public field to false.
When set to true, public allows anyone to mint from the initialized tree and
if false, only the tree creator will be able to mint from the tree.
Feel free to look at the code for the create_tree instruction handler and create_tree's expected accounts.
Mint cNFTs #
With the Merkle tree account and its corresponding Bubblegum tree config account initialized, it’s possible to mint cNFTs to the tree. The Bubblegum library, provides two instructions we can make use of depending on whether the minted asset will belong to a collection.
The two instructions are
- MintV1
await mintV1(umi, {
  leafOwner,
  merkleTree,
  metadata: {
    name: "My Compressed NFT",
    uri: "https://example.com/my-cnft.json",
    sellerFeeBasisPoints: 0, // 0%
    collection: none(),
    creators: [
      { address: umi.identity.publicKey, verified: false, share: 100 },
    ],
  },
}).sendAndConfirm(umi);- mintToCollectionV1
await mintToCollectionV1(umi, {
  leafOwner,
  merkleTree,
  collectionMint,
  metadata: {
    name: "My Compressed NFT",
    uri: "https://example.com/my-cnft.json",
    sellerFeeBasisPoints: 0, // 0%
    collection: { key: collectionMint, verified: false },
    creators: [
      { address: umi.identity.publicKey, verified: false, share: 100 },
    ],
  },
}).sendAndConfirm(umi);
Both functions will require you to pass in the NFT metadata and a list of
accounts required to mint the cNFT such as the leafOwner, merkleTree account
etc.
Interact with cNFTs #
It's important to note that cNFTs are not SPL tokens. That means your code needs to follow different conventions to handle cNFT functionality like fetching, querying, transferring, etc.
Fetch cNFT data #
The simplest way to fetch data from an existing cNFT is to use the Digital Asset Standard Read API (Read API). Note that this is separate from the standard JSON RPC. To use the Read API, you’ll need to use a supporting RPC Provider. Metaplex maintains a (likely non-exhaustive) list of RPC providers that support the DAS Read API.
In this lesson we’ll be using Helius as they have free support for Devnet.
You might need to update your RPC connection endpoint in the Umi instantiation
const umi = createUmi(
  "https://devnet.helius-rpc.com/?api-key=YOUR-HELIUS-API-KEY",
);
To use the Read API to fetch a specific cNFT, you need to have the cNFT’s asset ID. However, after minting cNFTs, you’ll have at most two pieces of information:
- The transaction signature
- The leaf index (possibly)
The only real guarantee is that you'll have the transaction signature. It is
possible to locate the leaf index from there, but it involves some fairly
complex parsing. The short story is you must retrieve the relevant instruction
logs from the Noop program and parse them to find the leaf index. We’ll cover
this more in depth in a future lesson. For now, we’ll assume you know the leaf
index.
This is a reasonable assumption for most mints given that the minting will be controlled by your code and can be set up sequentially so that your code can track which index is going to be used for each mint. I.e. the first mint will use index 0, the second index 1, etc.
Once you have the leaf index, you can derive the cNFT's corresponding asset ID. When using Bubblegum, the asset ID is a PDA derived using the Bubblegum program ID and the following seeds:
- The static string
assetrepresented in utf8 encoding - The Merkle tree address
- The leaf index
The indexer essentially observes transaction logs from the Noop program as
they happen and stores the cNFT metadata that was hashed and stored in the
Merkle tree. This enables them to surface that data when requested. This asset
ID is what the indexer uses to identify the particular asset.
For simplicity, you can just use the findLeafAssetIdPda helper function from
the Bubblegum library.
const [assetId, bump] = await findLeafAssetIdPda(umi, {
  merkleTree,
  leafIndex,
});
With the asset ID, fetching the cNFT is fairly straightforward. Simply use the
getAsset method provided by the supporting RPC provider and the dasApi
library:
const [assetId, bump] = await findLeafAssetIdPda(umi, {
  merkleTree,
  leafIndex,
});

const rpcAsset = await umi.rpc.getAsset(assetId);
This will return a JSON object that is comprehensive of what a traditional NFT's
on- and offchain metadata would look like combined. For example, you can find
the cNFT attributes at content.metadata.attributes or the image at
content.files.uri.
Query cNFTs #
The Read API also includes ways to get multiple assets, query by owner, creator, and more. For example, Helius supports the following methods:
getAssetgetSignaturesForAssetsearchAssetsgetAssetProofgetAssetsByOwnergetAssetsByAuthoritygetAssetsByCreatorgetAssetsByGroup
We won't go over most of these directly, but be sure to look through the Helius docs to learn how to use them correctly.
Transfer cNFTs #
Just as with a standard SPL token transfer, security is paramount. An SPL token transfer, however, makes verifying transfer authority very easy. It's built into the SPL Token program and standard signing. A compressed token's ownership is more difficult to verify. The actual verification will happen program-side, but your client-side code needs to provide additional information to make it possible.
While there is a Bubblegum createTransferInstruction helper function, there is
more assembly required than usual. Specifically, the Bubblegum program needs to
verify that the entirety of the cNFT's data is what the client asserts before a
transfer can occur. The entirety of the cNFT data has been hashed and stored as
a single leaf on the Merkle tree, and the Merkle tree is simply a hash of all
the tree's leafs and branches. Because of this, you can't simply tell the
program what account to look at and have it compare that account's authority
or owner field to the transaction signer.
Instead, you need to provide the entirety of the cNFT data and any of the Merkle tree's proof information that isn't stored in the canopy. That way, the program can independently prove that the provided cNFT data, and therefore the cNFT owner, is accurate. Only then can the program safely determine if the transaction signer should, in fact, be allowed to transfer the cNFT.
In broad terms, this involves a five step process:
- Fetch the cNFT's asset data from the indexer
- Fetch the cNFT's proof from the indexer
- Fetch the Merkle tree account from the Solana blockchain
- Prepare the asset proof as a list of
AccountMetaobjects - Build and send the Bubblegum transfer instruction
Fortunately, we can make use of the transfer method which takes care of all
these steps.
const assetWithProof = await getAssetWithProof(umi, assetId);

await transfer(umi, {
  ...assetWithProof,
  leafOwner: currentLeafOwner,
  newLeafOwner: newLeafOwner.publicKey,
}).sendAndConfirm(umi);
Conclusion #
We've covered the primary skills needed to interact with cNFTs, but haven't been fully comprehensive. You can also use Bubblegum to do things like burn, verify, delegate, and more. We won't go through these, but these instructions are similar to the mint and transfer process. If you need this additional functionality, take a look at the Bubblegum docs on how to leverage the helper functions it provides.
Lab #
Let's jump in and practice creating and working with cNFTs. Together, we'll build as simple a script as possible that will let us mint a cNFT collection from a Merkle tree.
1. Create a new project #
To begin create and initialize an empty NPM project and change directory into it.
mkdir cnft-demo
npm init -y
cd cnft-demo
Install all the required dependencies
npm i @solana/web3.js@1 @solana-developers/helpers@2.5.2 @metaplex-foundation/mpl-token-metadata @metaplex-foundation/mpl-bubblegum @metaplex-foundation/digital-asset-standard-api @metaplex-foundation/umi-bundle-defaults

npm i --save-dev esrun
In this first script, we will learn about creating a tree, hence let's create
the file create-tree.ts
mkdir src && touch src/create-tree.tsThis Umi instantiation code will be repeated in a lot of files, so feel free to create a wrapper file to instantiate it:
import { dasApi } from "@metaplex-foundation/digital-asset-standard-api";
import { createTree, mplBubblegum } from "@metaplex-foundation/mpl-bubblegum";
import { generateSigner, keypairIdentity } from "@metaplex-foundation/umi";
import { createUmi } from "@metaplex-foundation/umi-bundle-defaults";
import {
  getExplorerLink,
  getKeypairFromFile,
} from "@solana-developers/helpers";
import { clusterApiUrl } from "@solana/web3.js";

const umi = createUmi(clusterApiUrl("devnet"));

// load keypair from local file system
// See https://github.com/solana-developers/helpers?tab=readme-ov-file#get-a-keypair-from-a-keypair-file
const localKeypair = await getKeypairFromFile();

// convert to Umi compatible keypair
const umiKeypair = umi.eddsa.createKeypairFromSecretKey(localKeypair.secretKey);

// load the MPL Bubblegum program, dasApi plugin and assign a signer to our umi instance
umi.use(keypairIdentity(umiKeypair)).use(mplBubblegum()).use(dasApi());
In the code above, we load the user's keypair wallet from the system wallet
located at .config/solana/id.json, instantiate a new Umi instance and assign
the keypair to it. We also assign the Bubblegum and dasApi plugins to it as
well.
2. Create the Merkle tree account #
We’ll start by creating the Merkle tree account. To do this we will use the
createTree method from Metaplex Bubblegum program.
This function takes in three default values
merkleTree- The Merkle tree account addressmaxDepth- Determines the max number of leaves the tree will hold and therefore the max number of cNFTs that the tree can contain.maxBufferSize- Determines how many concurrent changes can occur in the tree in parallel.
You can also supply in optional fields such as
treeCreator- The address of the tree authority, defaults to currentumi.identityinstance.public- Determines whether anyone else apart from the tree creator will be able to mint cNFTs from the tree.
const merkleTree = generateSigner(umi);
const builder = await createTree(umi, {
  merkleTree,
  maxDepth: 14,
  maxBufferSize: 64,
});
await builder.sendAndConfirm(umi);

let explorerLink = getExplorerLink("address", merkleTree.publicKey, "devnet");
console.log(`Explorer link: ${explorerLink}`);
console.log("Merkle tree address is :", merkleTree.publicKey);
console.log("✅ Finished successfully!");
Run the create-tree.ts script using esrun
npx esrun create-tree.tsMake sure to remember the Merkle tree address as we will be using it in the next step when minting compressed NFTs.
Your output will be similar to this
Explorer link: https://explorer.solana.com/address/ZwzNxXw83PUmWSypXmqRH669gD3hF9rEjHWPpVghr5h?cluster=devnet
Merkle tree address is : ZwzNxXw83PUmWSypXmqRH669gD3hF9rEjHWPpVghr5h
✅ Finished successfully!
Congratulations! You've created a Bubblegum tree. Follow the Explorer link to make sure that the process finished successfully,
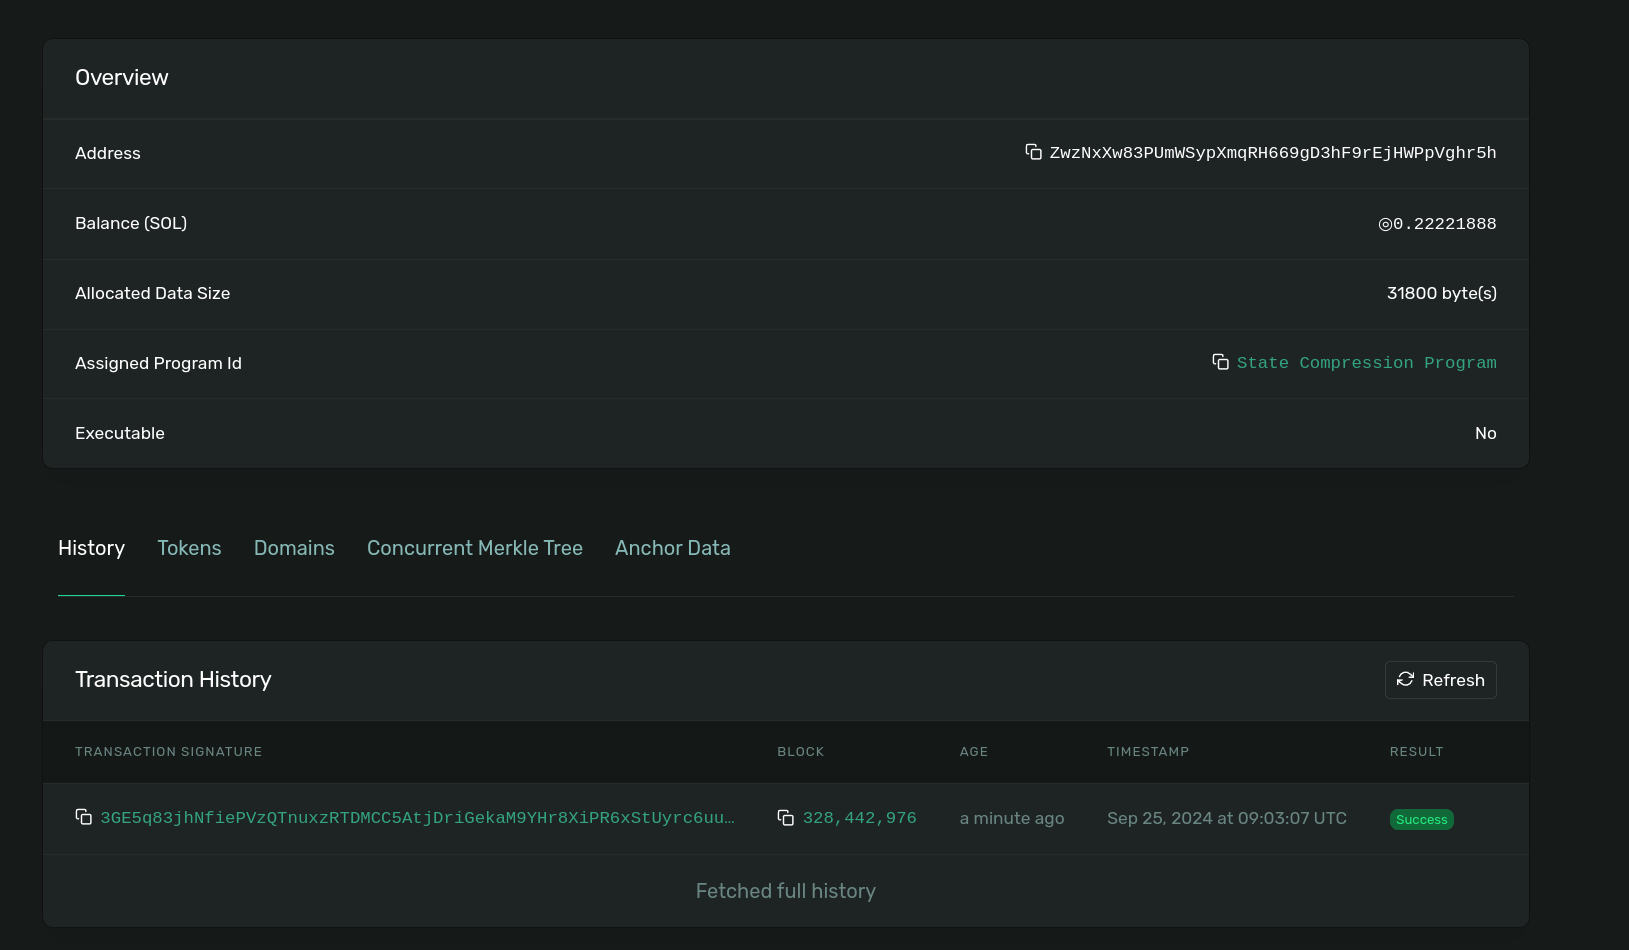 Solana Explorer with details about created Merkle tree
3. Mint cNFTs to your tree #
Believe it or not, that's all you needed to do to set up your tree to compressed NFTs! Now let's turn our attention to minting.
First, let's create a new file called mint-compressed-nft-to-collection.ts,
add our imports and instantiate Umi
import { dasApi } from "@metaplex-foundation/digital-asset-standard-api";
import {
  findLeafAssetIdPda,
  LeafSchema,
  mintToCollectionV1,
  mplBubblegum,
  parseLeafFromMintToCollectionV1Transaction,
} from "@metaplex-foundation/mpl-bubblegum";
import {
  keypairIdentity,
  publicKey as UMIPublicKey,
} from "@metaplex-foundation/umi";
import { createUmi } from "@metaplex-foundation/umi-bundle-defaults";
import { getKeypairFromFile } from "@solana-developers/helpers";
import { clusterApiUrl } from "@solana/web3.js";

const umi = createUmi(clusterApiUrl("devnet"));

// load keypair from local file system
// See https://github.com/solana-developers/helpers?tab=readme-ov-file#get-a-keypair-from-a-keypair-file
const localKeypair = await getKeypairFromFile();

// convert to Umi compatible keypair
const umiKeypair = umi.eddsa.createKeypairFromSecretKey(localKeypair.secretKey);

// load the MPL Bubblegum program, dasApi plugin and assign a signer to our umi instance
umi.use(keypairIdentity(umiKeypair)).use(mplBubblegum()).use(dasApi());
I am going to be recycling a Collection NFT I already created in the NFTs with Metaplex lesson, but if you'd like to create a new collection for this lesson, check out the code on this repo
Find the code to create a Metaplex Collection NFT in our NFTs with Metaplex lesson.
To mint a compressed NFT to a collection we will need
-
leafOwner- The recipient of the compressed NFT -
merkleTree- The Merkle tree address we created in the previous step -
collection- The collection our cNFT will belong to. This is not required, and you can leave it out if your cNFT doesn't belong to a collection. -
metadata- Your offchain metadata. This lesson won't focus onto how to prepare your metadata, but you can check out the recommended structure from Metaplex.
Our cNFT will use this structure we already prepared earlier.
{
  "name": "My NFT",
  "symbol": "MN",
  "description": "My NFT Description",
  "image": "https://lycozm33rkk5ozjqldiuzc6drazmdp5d5g3g7foh3gz6rz5zp7va.arweave.net/XgTss3uKlddlMFjRTIvDiDLBv6Pptm-Vx9mz6Oe5f-o",
  "attributes": [
    {
      "trait_type": "Background",
      "value": "transparent"
    },
    {
      "trait_type": "Shape",
      "value": "sphere"
    }
  ]
}
Putting it all into code, we will have
const merkleTree = UMIPublicKey("ZwzNxXw83PUmWSypXmqRH669gD3hF9rEjHWPpVghr5h");

const collectionMint = UMIPublicKey(
  "D2zi1QQmtZR5fk7wpA1Fmf6hTY2xy8xVMyNgfq6LsKy1",
);

const uintSig = await(
  await mintToCollectionV1(umi, {
    leafOwner: umi.identity.publicKey,
    merkleTree,
    collectionMint,
    metadata: {
      name: "My NFT",
      uri: "https://chocolate-wet-narwhal-846.mypinata.cloud/ipfs/QmeBRVEmASS3pyK9YZDkRUtAham74JBUZQE3WD4u4Hibv9",
      sellerFeeBasisPoints: 0, // 0%
      collection: { key: collectionMint, verified: false },
      creators: [
        {
          address: umi.identity.publicKey,
          verified: false,
          share: 100,
        },
      ],
    },
  }).sendAndConfirm(umi),
).signature;

const b64Sig = base58.deserialize(uintSig);
console.log(b64Sig);
The difference between the first statement is that we are returning the byte array representing the transaction signature.
We need this has in order to be able to get the leaf schema and with this schema derive the asset ID.
const leaf: LeafSchema = await parseLeafFromMintToCollectionV1Transaction(
  umi,
  uintSig,
);
const assetId = findLeafAssetIdPda(umi, {
  merkleTree,
  leafIndex: leaf.nonce,
})[0];
With everything in place, we can now run our script
mint-compressed-nft-to-collection.ts
npx esrun mint-compressed-nft-to-collection.tsYour output should resemble
asset id: D4A8TYkKE5NzkqBQ4mPybgFbAUDN53fwJ64b8HwEEuUS
✅ Finished successfully!
We aren't returning the Explorer link because this address won't exists on the Solana state but is indexed by RPCs that support the DAS API.
In the next step we will query this address to fetch out cNFT details.
4. Read existing cNFT data #
Now that we’ve written code to mint cNFTs, let’s see if we can actually fetch their data.
Create a new file fetch-cnft-details.ts
fetch-cnft-details.tsImport our packages and instantiate Umi. Here we will finally make use of the
umi.use(dasApi()) we've been importing.
In the instantiation of Umi, we are going to make a change to our connection endpoint and use an RPC that supports the DAS API.
Be sure to update this with your Helius API keys which you can get from the developer dashboard page
import { dasApi } from "@metaplex-foundation/digital-asset-standard-api";
import { mplBubblegum } from "@metaplex-foundation/mpl-bubblegum";
import {
  keypairIdentity,
  publicKey as UMIPublicKey,
} from "@metaplex-foundation/umi";
import { createUmi } from "@metaplex-foundation/umi-bundle-defaults";
import { getKeypairFromFile } from "@solana-developers/helpers";

const umi = createUmi(
  "https://devnet.helius-rpc.com/?api-key=YOUR-HELIUS-API-KEY",
);

// load keypair from local file system
// See https://github.com/solana-developers/helpers?tab=readme-ov-file#get-a-keypair-from-a-keypair-file
const localKeypair = await getKeypairFromFile();

// convert to Umi compatible keypair
const umiKeypair = umi.eddsa.createKeypairFromSecretKey(localKeypair.secretKey);

// load the MPL Bubblegum program, dasApi plugin and assign a signer to our umi instance
umi.use(keypairIdentity(umiKeypair)).use(mplBubblegum()).use(dasApi());
Fetching a compressed NFT details is as simple as calling the getAsset method
with the assetId from the previous step.
const assetId = UMIPublicKey("D4A8TYkKE5NzkqBQ4mPybgFbAUDN53fwJ64b8HwEEuUS");

// @ts-ignore
const rpcAsset = await umi.rpc.getAsset(assetId);
console.log(rpcAsset);
Let’s start by declaring a function logNftDetails that takes as parameters
treeAddress and nftsMinted.
The output of our console.log would output
{
  interface: 'V1_NFT',
  id: 'D4A8TYkKE5NzkqBQ4mPybgFbAUDN53fwJ64b8HwEEuUS',
  content: {
    '$schema': 'https://schema.metaplex.com/nft1.0.json',
    json_uri: 'https://chocolate-wet-narwhal-846.mypinata.cloud/ipfs/QmeBRVEmASS3pyK9YZDkRUtAham74JBUZQE3WD4u4Hibv9',
    files: [ [Object] ],
    metadata: {
      attributes: [Array],
      description: 'My NFT Description',
      name: 'My NFT',
      symbol: '',
      token_standard: 'NonFungible'
    },
    links: {
      image: 'https://lycozm33rkk5ozjqldiuzc6drazmdp5d5g3g7foh3gz6rz5zp7va.arweave.net/XgTss3uKlddlMFjRTIvDiDLBv6Pptm-Vx9mz6Oe5f-o'
    }
  },
  authorities: [
    {
      address: '4sk8Ds1T4bYnN4j23sMbVyHYABBXQ53NoyzVrXGd3ja4',
      scopes: [Array]
    }
  ],
  compression: {
    eligible: false,
    compressed: true,
    data_hash: '2UgKwnTkguefRg3P5J33UPkNebunNMFLZTuqvnBErqhr',
    creator_hash: '4zKvSQgcRhJFqjQTeCjxuGjWydmWTBVfCB5eK4YkRTfm',
    asset_hash: '2DwKkMFYJHDSgTECiycuBApMt65f3N1ZwEbRugRZymwJ',
    tree: 'ZwzNxXw83PUmWSypXmqRH669gD3hF9rEjHWPpVghr5h',
    seq: 4,
    leaf_id: 3
  },
  grouping: [
    {
      group_key: 'collection',
      group_value: 'D2zi1QQmtZR5fk7wpA1Fmf6hTY2xy8xVMyNgfq6LsKy1'
    }
  ],
  royalty: {
    royalty_model: 'creators',
    target: null,
    percent: 0,
    basis_points: 0,
    primary_sale_happened: false,
    locked: false
  },
  creators: [
    {
      address: '4kg8oh3jdNtn7j2wcS7TrUua31AgbLzDVkBZgTAe44aF',
      share: 100,
      verified: false
    }
  ],
  ownership: {
    frozen: false,
    delegated: false,
    delegate: null,
    ownership_model: 'single',
    owner: '4kg8oh3jdNtn7j2wcS7TrUua31AgbLzDVkBZgTAe44aF'
  },
  supply: { print_max_supply: 0, print_current_supply: 0, edition_nonce: null },
  mutable: true,
  burnt: false
}
Remember, the Read API also includes ways to get multiple assets, query by owner, creator, etc., and more. Be sure to look through the Helius docs to see what's available.
5. Transfer a cNFT #
The last thing we're going to add to our script is a cNFT transfer. Just as with a standard SPL token transfer, security is paramount. Unlike with a standard SPL token transfer, however, to build a secure transfer with state compression of any kind, the program performing the transfer needs the entire asset data.
Fortunately for us can get the asset data with the getAssetWithProof method.
Le't first create a new file transfer-asset.ts, and populate it with the code
for instantiating a new Umi client.
import { dasApi } from "@metaplex-foundation/digital-asset-standard-api";
import {
  getAssetWithProof,
  mplBubblegum,
  transfer,
} from "@metaplex-foundation/mpl-bubblegum";
import {
  keypairIdentity,
  publicKey as UMIPublicKey,
} from "@metaplex-foundation/umi";
import { createUmi } from "@metaplex-foundation/umi-bundle-defaults";
import { base58 } from "@metaplex-foundation/umi/serializers";
import {
  getExplorerLink,
  getKeypairFromFile,
} from "@solana-developers/helpers";
import { clusterApiUrl } from "@solana/web3.js";

const umi = createUmi(clusterApiUrl("devnet"));

// load keypair from local file system
// See https://github.com/solana-developers/helpers?tab=readme-ov-file#get-a-keypair-from-a-keypair-file
const localKeypair = await getKeypairFromFile();

// convert to Umi compatible keypair
const umiKeypair = umi.eddsa.createKeypairFromSecretKey(localKeypair.secretKey);

// load the MPL Bubblegum program, dasApi plugin and assign a signer to our umi instance
umi.use(keypairIdentity(umiKeypair)).use(mplBubblegum()).use(dasApi());
We are not ready to transfer our asset. Using the assetId for our cNFT, we can
call the transfer method from the Bubblegum library
const assetId = UMIPublicKey("D4A8TYkKE5NzkqBQ4mPybgFbAUDN53fwJ64b8HwEEuUS");

//@ts-ignore
const assetWithProof = await getAssetWithProof(umi, assetId);

let uintSig = await(
  await transfer(umi, {
    ...assetWithProof,
    leafOwner: umi.identity.publicKey,
    newLeafOwner: UMIPublicKey("J63YroB8AwjDVjKuxjcYFKypVM3aBeQrfrVmNBxfmThB"),
  }).sendAndConfirm(umi),
).signature;

const b64sig = base58.deserialize(uintSig);

let explorerLink = getExplorerLink("transaction", b64sig, "devnet");
console.log(`Explorer link: ${explorerLink}`);
console.log("✅ Finished successfully!");
Running our script with npx esrun transfer-asset.ts, should output something
similar to this if successful:
Explorer link: https://explorer.solana.com/tx/3sNgN7Gnh5FqcJ7ZuUEXFDw5WeojpwkDjdfvTNWy68YCEJUF8frpnUJdHhHFXAtoopsytzkKewh39Rf7phFQ2hCF?cluster=devnet
✅ Finished successfully!
Open the explorer link, and scroll to the bottom to observer your tx logs,
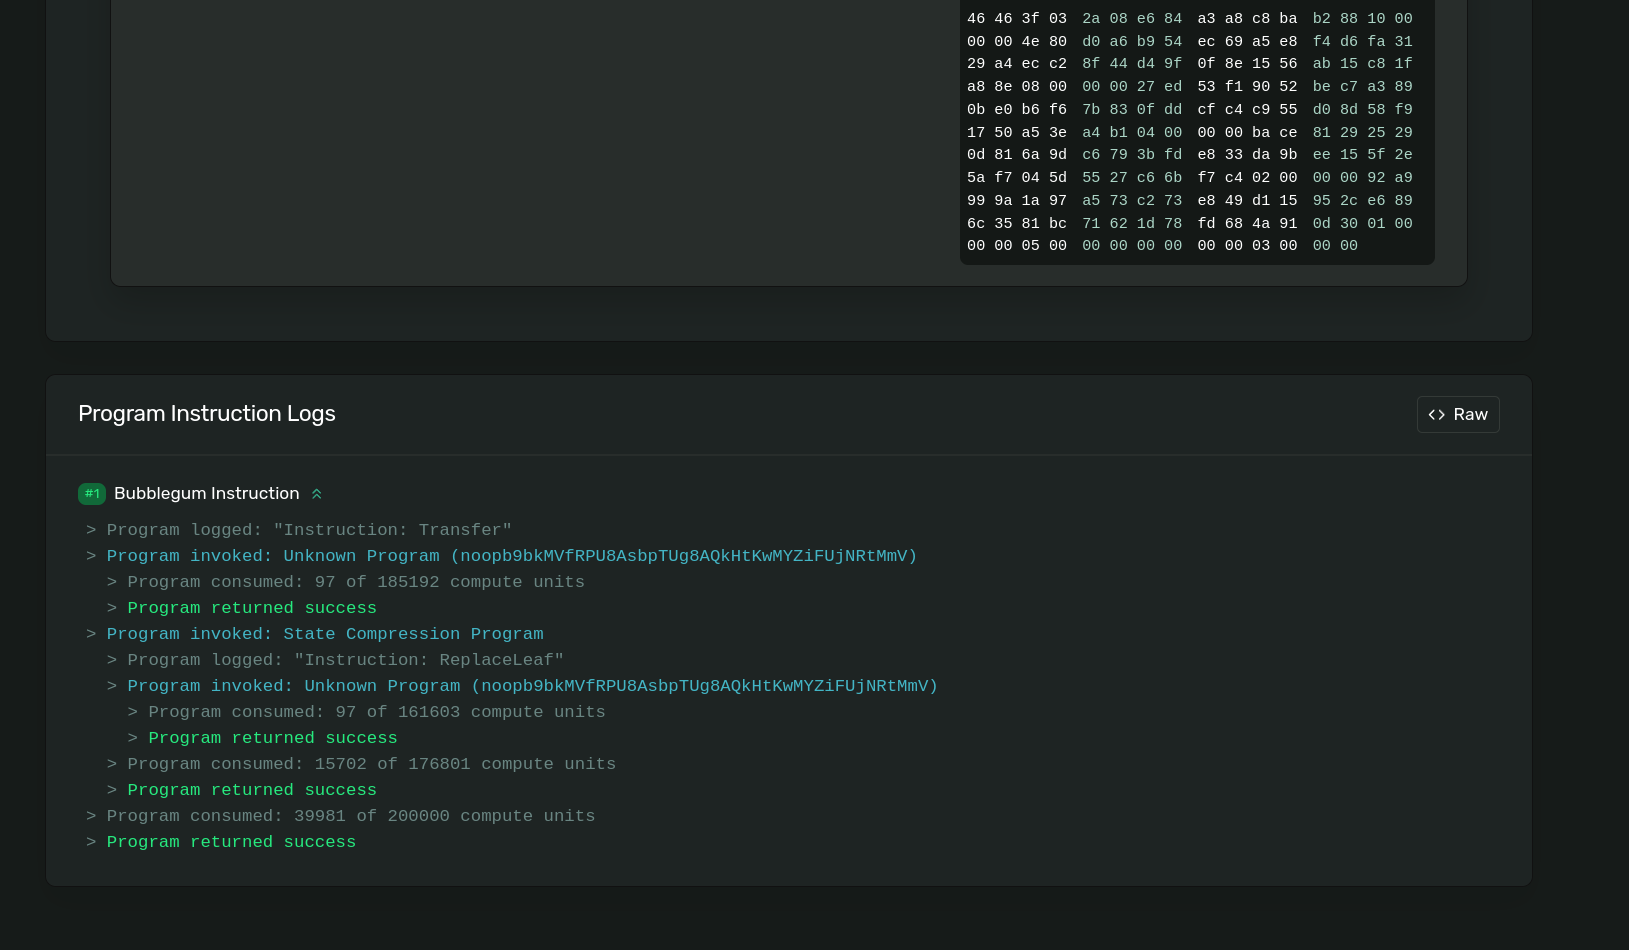 Solana Explorer showing logs of the transfer cnft instruction
Congratulations! Now you know how to mint, read, and transfer cNFTs. If you wanted, you could update the max depth, max buffer size, and canopy depth to larger values and as long as you have enough Devnet SOL, this script will let you mint up to 10k cNFTs for a small fraction of what it would cost to mint 10k traditional NFTs.
Inspect the cNFT on Solana Explorer! Just like previously, if you have any issues, you should fix them yourself, but if needed the solution code is available.
Challenge #
It's your turn to take these concepts for a spin on your own! We're not going to be overly prescriptive at this point, but here are some ideas:
- Create your own production cNFT collection
- Build a UI for this lesson's lab that will let you mint a cNFT and display it
- See if you can replicate some of the lab script's functionality in an onchain program, i.e. write a program that can mint cNFTs
Push your code to GitHub and tell us what you thought of this lesson!